What is Capacitor?
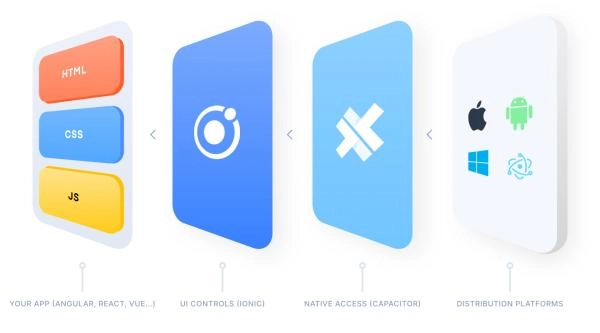
Capacitor is an open-source native runtime developed by the team behind Ionic. It enables developers to build Web Native apps—apps that are built with web technologies like HTML, CSS, and JavaScript, but can run natively on iOS, Android, and in the browser.
Capacitor acts as a bridge between web apps and native functionality, allowing you to:
- Access native device features (camera, GPS, file system, etc.)
- Use modern frontend frameworks (React, Vue, Angular, etc.)
- Build once and deploy across platforms
- Use native UI where needed
Introduction
This is a starter app example with VueJS, showcasing the integration of the barKoder Barcode Scanner SDK for Capacitor. The barKoder Barcode Scanner SDK is an enterprise-grade solution that provides a highly customizable interface for barcode scanning in both iOS and Android apps.
Key Features:
- Utilizes VueJS for building the app's user interface.
- Integrates the barKoder Barcode Scanner SDK to enable advanced barcode scanning.
- Leverages Capacitor for seamless cross-platform deployment to iOS and Android.
- Supports a wide range of barcode types, including 1D and 2D barcodes.
barKoder Barcode Scanner SDK plugin for Capacitor
The barKoder Barcode Scanner SDK is designed to transform smartphones and tablets into rugged barcode scanning devices. It boasts a robust barcode reading engine that supports various barcode types with exceptional speed and recognition rates.

Requirements
Capacitor is a cross-platform app runtime that makes it easy to build web apps that run natively on iOS, Android and the web. To get started with building apps using Capacitor, you'll need to meet certain requirements:
Node.js and npm:
Text Editor or IDE:
- Choose a text editor or IDE for coding (e.g., Visual Studio Code, Sublime Text).
Git:
- Install Git for version control and project management. Git will help you track changes and collaborate with others on the project.
Command Line Interface (CLI):
- Capacitor commands are executed via the command line. Make sure you have a command line interface (CLI) installed and accessible on your system.
- Terminal (macOS/Linux)
- Command Prompt (Windows)
- PowerShell (Windows)
Mobile Development SDKs:
- iOS Development: Install Xcode (macOS only) for iOS development. Xcode provides the necessary tools and emulators for testing your app on iOS devices.
- Android Development: Install Android Studio for Android development. Android Studio includes the Android SDK and an emulator for testing your app on Android devices.
Getting Started with Barkoder + Capacitor + Vue
This guide will walk you through the initial setup required to start building a Web Native app using Vue.js, Capacitor, and the Barkoder plugin for scanning.
Required Dependencies
Core Framework
vue– The frontend framework for building your web app
Capacitor Core
@capacitor/core– Core Capacitor runtime@capacitor/cli– Command-line interface for Capacitor
Platform Support
@capacitor/android– Android platform integration@capacitor/ios– iOS platform integration
Native Plugins
@capacitor/camera– Access to native camera functionalitybarkoder-capacitor– Barkoder plugin for barcode/VIN scanning
Open IDE and Start Coding:
- Open your chosen IDE or text editor and start building your app
- Install the required dependencies:
3. Add platforms for iOS and Android
npx cap add ios
npx cap add android
4. Build the project and Synchronize the project with Capacitor:
npm run build
npx cap sync
5. Open the project in your chosen IDE or text editor:
npx cap open ios
npx cap open android
6. If you don't have global Android, SDK envsynchronize do this:
- Create local.properties file in android folder and enter path:
sdk.dir = C://Users//YOUR_USERNAME//AppData//Local//Android//sdk
7. Camera permissions:
Our SDK requires camera permission to be granted in order to use scanning features.
- For Android, the permission is set in the manifest from the package.
- For iOS you need to specify camera permission in Info.plist file inside your project
<key>NSCameraUsageDescription</key><string>Camera permission</string>
- Start coding and customizing the app to meet your specific requirements.
These steps provide a basic overview, and it's always a good idea to refer to the official Capacitor documentation for the latest and most accurate information: Capacitor Documentation.
Manual Installation
If you prefer installing from a local folder, follow these steps:
- Download the zip file
- Unpack the zip file
- Paste the folder in app directory ex. myApp/barkoder-capacitor
- Run the following command:
npm install
Usage with VueJS
In your vue component file:
<template>
    <div id="container">
        <div class="app_title" :style="{backgroundPosition: isScanning || scannedResult?.thumbnailImage  ? 'top' :   'bottom' }">
            <div class="title_settings_container">
              <img v-if="isScanning && !scannedResult?.thumbnailImage" @click="stopScanning" alt="touch icon" src="../  assets/close.svg">
              <h2 style="width: 100%;">Capacitor + Vue</h2>
              <img alt="settings icon" src="../assets/Settings.svg" @click="handleSettingsClick">
            </div>
        </div>
        <div id="barkoderView" ref="barkoderView" style="height: 85vh" :style="{ minHeight: scannedResult?.thumbnailImage && !isScanning ? '85vh' : '85vh', top:   '60px'  }">
        <img v-if="scannedResult?.resultImage" class="fullResultImage" :src="scannedResult?.resultImage" @click="startScanning" alt="Scanned Thumbnail" />
        <div v-if="scannedResult?.resultImage" class="tap_anywhere_popup" @click="startScanning">
          <img alt="touch icon" src="../assets/touch_app.svg">
          <span>Tap anywhere to continue</span>
        </div>
      </div>

        <div v-if="scannedResult" class="resultContainer">
           <div class="result_text_img">
              <span class="result_title"> {{ scannedResult.type }}</span>
              <img v-if="scannedResult?.thumbnailImage" class="resultImage" :src="scannedResult?.thumbnailImage" alt="Scanned Thumbnail" />
              <p class="result_desc">Result:
                <a class="result_link" :href="scannedResult.textualData"> {{ scannedResult.textualData }} </a>
              </p>
            </div>
        </div>
    </div></template>

<script>
import { ref, onMounted, onUnmounted, reactive, computed } from 'vue';
import { Barkoder, BarcodeType } from 'barkoder-capacitor';

export default {
    setup() {
        const barkoderViewRef = ref('');
        const barkoderInitialized = ref(false);
        const scannedResult = ref(null);
        const isScanning = ref(false);
        const recentScans = ref([]);

        const barcodeTypes = [
          { name: "QR", type: "qr", mode: "2d" },
          { name: "Qr Micro", type: "qrMicro",  mode: "2d" },
          { name: "Aztec Compact", type: "aztecCompact", mode: "2d" },
          { name: "Aztec", type: "aztec", mode: "2d" },
          { name: "Datamatrix", type: "datamatrix", mode: "2d" },
          { name: "Dotcode", type: "dotcode", mode: "2d" },
          { name: "Code 128", type: "code128",  mode: "1d" },
          { name: "Code 93", type: "code93",  mode: "1d" },
          { name: "Code 39", type: "code39",  mode: "1d" },
          { name: "Codabar", type: "codabar",  mode: "1d" },
          { name: "Code 11", type: "code11",  mode: "1d" },
          { name: "Ean 8", type: "ean8",  mode: "1d" },
          { name: "Ean 13", type: "ean13",  mode: "1d" },
          { name: "Msi", type: "msi",  mode: "1d" },
          { name: "UpcA", type: "upcA",  mode: "1d" },
          { name: "UpcE", type: "upcE",  mode: "1d" },
          { name: "PDF 417", type: "pdf417",  mode: "2d" },
          { name: "Databar 14", type: "databar14",  mode: "1d" },
        ];

         const setActiveBarcodeTypes = async () => {
            try {
              Object.keys(enabledBarcodes).forEach((barcodeType) => {                const isEnabled = enabledBarcodes[barcodeType];                Barkoder.setBarcodeTypeEnabled({ type: BarcodeType[barcodeType], enabled: isEnabled });              });            } catch (error) {              console.error("Error setting active barcode types:", error);            }        };

        const setBarkoderSettings = async () => {            try {                Barkoder.setRegionOfInterestVisible({ value: true });                Barkoder.setRegionOfInterest({ left: 5, top: 5, width: 90, height: 90 });                Barkoder.setCloseSessionOnResultEnabled({ enabled: true });                Barkoder.setMaximumResultsCount({ value: 200 });                Barkoder.setImageResultEnabled({ enabled: true });                Barkoder.setLocationInImageResultEnabled({ enabled: true });                Barkoder.setLocationInPreviewEnabled({ enabled: true });                Barkoder.setBarcodeThumbnailOnResultEnabled({ enabled: true });                Barkoder.setBeepOnSuccessEnabled({ enabled: true });                Barkoder.setPinchToZoomEnabled({ enabled: true });                Barkoder.setZoomFactor({ value: currentZoomFactor.value });            } catch (error) {                console.error('Error setting Barkoder settings:', error);                throw error;             }        };

        const startScanning = async () => {            scannedResult.value = null;            isScanning.value = true;            try {               if (barkoderInitialized.value) {                 await Barkoder.startScanning();                 console.log('Scanning started');               } else {                 alert('Scanner is not initialized yet.');               }            } catch (error) {               console.error('Error during scanning:', error);               alert(`Error: ${error}`);               isScanning.value = false;            }        };

        const stopScanning = async () => {            scannedResult.value = {                textualData: null,                type: null,                resultImage: null,                thumbnailImage: null,            }            isScanning.value = false;            await Barkoder.stopScanning();        };

        onMounted(() => {           barkoderViewRef.value = document.getElementById('barkoderView');           initializeScanner();           document.addEventListener('mousedown', handleClickOutside);         });

        onUnmounted(() => {          document.removeEventListener('mousedown', handleClickOutside);        });

        Barkoder.addListener('barkoderResultEvent', (barkoderResult) => {            const randomId = Math.floor(Math.random() * 1000000);                  scannedResult.value = {              id: randomId,                  textualData: barkoderResult?.decoderResults[0]?.textualData || 'No data available',                  type: barkoderResult?.decoderResults[0]?.barcodeTypeName || 'Unknown type',                  resultImage: `data:image/jpeg;base64,${barkoderResult?.resultImageAsBase64 || ''}`,                  thumbnailImage: `data:image/jpeg;base64,${barkoderResult?.resultThumbnailsAsBase64[0] || ''}`,            };

            const results = barkoderResult?.decoderResults.map((decoderResult) => ({              id: randomId,              textualData: decoderResult.textualData || 'No data available',              type: decoderResult.barcodeTypeName || 'Unknown type',            }));
            recentScans.value.push(...results);
            Barkoder.stopScanning()
            isScanning.value = false;
        });

        return {
            barkoderViewRef,
            startScanning,
            stopScanning,
            scannedResult,
            isScanning,
            barcodeTypes,
            recentScans
        }
    }
}

</script>
<style>
#barkoderView {
min-height: 85vh;
height: 100%;
position: relative;
top: 60px;
}
#barkoderView .fullResultImage {
height: 100%;
width: 100%;
}
.resultContainer {
width: 100%;
}
// other styles as needed
</style>
Documentation
You can find full documentation about the barKoder Barcode Reader SDK here: https://docs.barkoder.com/en/capacitor-installation
Trial License
barKoder SDK uses a license to operate.
Running the barKoder Barcode Scanner SDK without a valid trial or production license will still produce a result but the result will be prefixed with an Unlicensed string. Don't worry, though! You can easily get a trial license by registering on the barKoder Portal and using the self-service Evaluation License Generation.
Each trial license will be good for an initial duration of 30 days and can be deployed to up to 25 devices. For any custom requirements, contact our sales team via sales@barkoder.com or utilize the Ticketing System of the barKoder Developer Portal.
Note: Trial licenses are for development or staging environments only. Do not publish a trial license with your app to public stores.