Image Preprocessing for improving Barcode Detection in Python
Barcode detection is largely dependent on good input - meaning samples with decent sharpness, contrast, and clean patterns. However, real-world conditions are not always ideal — poor lighting, blurness, or low-resolution images, can degrade image quality and make detection harder. While the Barkoder SDK can deal with such challenges up to a point, detection could be further improved with image preprocessing in certain scenarios.
OpenCV is a powerful library which can be used for image preprocessing.
QR codes with low contrast and low amount of well defined details #
                import numpy as np
import cv2 as cv

img = cv.imread(file, cv.IMREAD_GRAYSCALE)

#-----------apply-image-processing--------

# Apply Gaussian blur with sigma = 10.0
gaussian_blur = cv.GaussianBlur(img, (0, 0), 10.0) #sigma = 6-10

# Apply unsharp mask with 500% sharpening (5.0 weight for the original)
unsharp_image = cv.addWeighted(img, 5.0, gaussian_blur, -4.0, 0) #intensity 5-8, if 8, negative could be -7

# Step 3: Apply erode filter
kernel = np.ones((3, 3), np.uint8)  # Define a 3x3 kernel
eroded_image = cv.erode(unsharp_image, kernel, iterations=1)

#-----------apply-image-processing--------
Lets go through the code from above:
1. Apply Gaussian blur #
                # Apply Gaussian blur with sigma = 10.0
gaussian_blur = cv.GaussianBlur(img, (0, 0), 10.0)
This applies a Gaussian blur to the image.
- The Gaussian blur smoothens the image by reducing high-frequency noise and detail.
- The kernel size (0, 0) lets OpenCV automatically calculate it based on the sigma value.
- A large sigma like 10.0 applies a strong blur, which softens both noise and edges.
Overall, this can suppress small variations or texture (which can confuse edge detectors), and isolate larger structures in the image (like QR code blocks) from fine-grain noise.
Of course exact settings will be dependent on specific samples. The sigma argument could have values in the range of 6 and 10 for example, each producing a different preprocessed image, and thus resulting in different success ratio during barcode detection.
This step is the first half of an unsharp masking technique (see next).
2. Apply unsharp mask #
                # Apply unsharp mask with 500% sharpening
unsharp_image = cv.addWeighted(img, 5.0, gaussian_blur, -4.0, 0)
This combines the original image with the blurred version to produce a sharpened image. It exaggerates the difference between the image and its blur, which boosts edges.
That enhances the edges and contrast, especially in regions where barcodes or QR codes reside, and makes low contrast QR codes stand out better against the background, essentially making the dark lines of a QR code even darker, and the light areas lighter — making it easier to detect the pattern.
Same as before, exact settings will be dependent on specific samples. The 2nd argument for intensity could have values in the range of 5 and 8 for example, whereas the 4th argument for the negative could be in the range of -4 down to -7, with some values in both arguments working better with each other in improving the success ratio during barcode detection.
While these 2 steps could suffice, additional preprocessing can be done.
3. Apply erode filter (optional) #
                # Apply erode filter
kernel = np.ones((3, 3), np.uint8)
eroded_image = cv.erode(unsharp_image, kernel, iterations=1)
This performs morphological erosion, which shrinks bright regions and expands dark areas. That cleans up small noise and helps to refine the shapes of the barcode, possibly making it easier for detection algorithms to identify the correct lines and patterns.
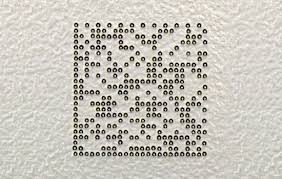
Dotted DataMatrix codes on a dark background #
                import numpy as np
import cv2 as cv

#-----------------------------------------
def dilate_image(img, k=5, it=1):
	kernel = np.ones((k, k), np.uint8)
	return cv.dilate(img, kernel, iterations=it)
#-----------------------------------------

img = cv.imread(file, cv.IMREAD_GRAYSCALE)

dilated_image = dilate_image(img)
1. Apply dilate filter #
                def dilate_image(img, k=5, it=1):
    kernel = np.ones((k, k), np.uint8)
    return cv.dilate(img, kernel, iterations=it)
This performs the morphological dilation, which expands bright (white) regions in the image. That causes white shapes (like the DM code modules) to grow.
DM codes often have broken or dotted lines, especially under poor printing or scanning conditions, low resolution, etc. Dilation helps to fill in small gaps or broken edges, so the code becomes more complete and easier to decode.
- The kernel size (5, 5) is moderately aggressive. Larger kernel leads to stronger dilation (more pixel expansion).
You might reduce it to 3 for finer control or increase it to 7 for heavily broken codes.
- The number of iterations (it=1 by default, enough in many cases) controls how aggressively the image is dilated.
The following sections will help center barcodes #
2. Find regions likely to contain barcodes #
                img = cv.imread(file, cv.IMREAD_GRAYSCALE)

padding_rate = 0.5
detection_scale = 0.4

original_height, original_width = img.shape[:2]
scaled_img = cv.resize(img, (0, 0), fx=detection_scale, fy=detection_scale)

blurred = cv.GaussianBlur(scaled_img, (5, 5), 0)
thresh = cv.adaptiveThreshold(blurred, 255, cv.ADAPTIVE_THRESH_MEAN_C, cv.THRESH_BINARY_INV, 13, 13)
kernel = cv.getStructuringElement(cv.MORPH_ELLIPSE, (3, 3))
morphed = cv.dilate(thresh, kernel, iterations=2)

contours, _ = cv.findContours(morphed, cv.RETR_EXTERNAL, cv.CHAIN_APPROX_SIMPLE)
valid_contours = [cnt for cnt in contours if cv.contourArea(cnt) > 100]
if not valid_contours:
	return img

# Find the rectangle before returning to the original resolution
all_points = np.concatenate(valid_contours)
A few different operations are carried out in this section:
- Downscaling for speed and simplification
scaled_img = cv.resize(img, (0, 0), fx=detection_scale, fy=detection_scale)
This reduces processing time and removes fine noise. That also helps contour-based detection by simplifying the image structure.
- Gaussian Blur for noise reduction
blurred = cv.GaussianBlur(scaled_img, (5, 5), 0)
This smooths the image to suppress small noise. That helps contour detection by reducing random variations.
- Adaptive Threshold for binary segmentation under uneven lighting
thresh = cv.adaptiveThreshold(blurred, 255, cv.ADAPTIVE_THRESH_MEAN_C, cv.THRESH_BINARY_INV, 13, 13)
This converts the image to binary, which is essential when lighting is uneven. The cv.THRESH_BINARY_INV argument produces white shapes (foreground) on black background, which is good for finding code shapes via contour detection.
- Dilation for connecting broken parts and to strengthen features
                kernel = cv.getStructuringElement(cv.MORPH_ELLIPSE, (3, 3))
morphed = cv.dilate(thresh, kernel, iterations=2)
This expands white regions to connect broken parts of potential codes, and helps reconnect fragmented code blocks.
- Contour Detection for identifying candidate regions (i.e. barcodes)
contours, _ = cv.findContours(morphed, cv.RETR_EXTERNAL, cv.CHAIN_APPROX_SIMPLE)
This finds external contours in the morphed binary image. #morphed=dilated These contours will represent possible regions of interest (e.g. barcode boundaries).
- Contour Filtering for removing small irrelevant noise
valid_contours = [cnt for cnt in contours if cv.contourArea(cnt) > 100]
This filters out small, irrelevant contours (noise). Using 100 is an empirical threshold. It can be tuned depending on image resolution or expected code size.
- Contour Merging to prepare for bounding box calculation
all_points = np.concatenate(valid_contours)
This combines all the filtered contour points into a single set, and is used next to compute a bounding box / region of interest (ROI) around all detected structures (i.e. potential barcodes).
3. Locate, align, and crop the ROI that likely contains a barcode #
                rotated_rect = cv.minAreaRect(all_points)

# Convert coordinates to original resolution
(center_x, center_y), (width, height), angle = rotated_rect
center_x *= 1 / detection_scale
center_y *= 1 / detection_scale
width *= 1 / detection_scale
height *= 1 / detection_scale

if width > height:
	angle += 90
	width, height = height, width

# Return and crop the original image
m = cv.getRotationMatrix2D((center_x, center_y), angle, 1.0)
rotated = cv.warpAffine(img, m, (original_width, original_height))

box = cv.boxPoints(((center_x, center_y), (width, height), 0))
box = box.astype(np.intp)
x, y, w, h = cv.boundingRect(box)

# Crop out the desired area

pad_w = int(w * padding_rate)
pad_h = int(h * padding_rate)
x = max(x - pad_w, 0)
y = max(y - pad_h, 0)
w = min(w + 2 * pad_w, rotated.shape[1] - x)
h = min(h + 2 * pad_h, rotated.shape[0] - y)

cropped = rotated[y: y + h, x: x + w].copy()
A few different operations are done in this section:
- Finding tilted bounding box of barcode
rotated_rect = cv.minAreaRect(all_points)
This finds the smallest rotated rectangle that encloses all the valid contours detected previously, even if it's tilted. The angle of tilt (if any) is also found.
- Rotating image to deskew barcode
                if width > height:
	angle += 90
	width, height = height, width
This ensures the barcode is treated as being vertical / "upright" rather than horizontal.
                m = cv.getRotationMatrix2D((center_x, center_y), angle, 1.0)
rotated = cv.warpAffine(img, m, (original_width, original_height))
This does the actual alignment by applies rotation to the original image to deskew the barcode.
- Getting the cropped region with a margin
                box = cv.boxPoints(((center_x, center_y), (width, height), 0))
x, y, w, h = cv.boundingRect(box)
This gets a tight bounding box around the rotated barcode area.
                pad_w = int(w * padding_rate)
pad_h = int(h * padding_rate)
This expands the bounding box to include some margin / pad.
cropped = rotated[y: y + h, x: x + w].copy()
This gets the final result i.e. a clean and padded crop of the barcode region in the original image.
3. Crop the ROI that likely contains a barcode but keep even padding (optional) #
In case the barcode and its bounding box is near the edge of the image, not all sides would get even padding, and the DataMatrix code might not be centered in the final result.
In such a case, you can either add no padding, or fill-in the missing side with black pixels for example, as done here:
                # Compute box points (in rotated image coordinates)
box = cv.boxPoints(((center_x, center_y), (width, height), 0))  # no angle, already rotated
box = np.array(box, dtype="float32")

# Add padding directly to width and height
pad_w = int(width * padding_rate)
pad_h = int(height * padding_rate)

# Increase the box size
padded_width = int(width + 2 * pad_w)
padded_height = int(height + 2 * pad_h)

# New destination rectangle (what we want to warp to)
dst_pts = np.array([
	[0, padded_height - 1],
	[0, 0],
	[padded_width - 1, 0],
	[padded_width - 1, padded_height - 1]
], dtype="float32")

# Shift box outward (simulate padding by expanding around center)
# Calculate center of the original box
center = np.mean(box, axis=0)

# Scale box outward from center to add padding
def scale_box(box, center, scale_x, scale_y):
	scaled = (box - center) * [scale_x, scale_y] + center
	return scaled.astype("float32")

scale_x = (width + 2 * pad_w) / width
scale_y = (height + 2 * pad_h) / height

padded_box = scale_box(box, center, scale_x, scale_y)

# Get transform matrix and warp
M = cv.getPerspectiveTransform(padded_box, dst_pts)
cropped = cv.warpPerspective(rotated, M, (padded_width, padded_height))
References:
- OpenCV: Smoothing Images
- OpenCV: Adding (blending) two images using OpenCV
- OpenCV: Eroding and Dilating
- OpenCV: Image Thresholding
- OpenCV: Contours
- OpenCV: Contour Features
- OpenCV: Affine Transformations