Installation Guide for barKoder's iOS Barcode Scanner SDK
Please follow these simple steps to integrate our SDK into your iOS project.
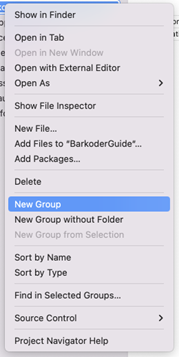
Create a new group #
Name the group “frameworks”. This name is optional, you can use any label you prefer.
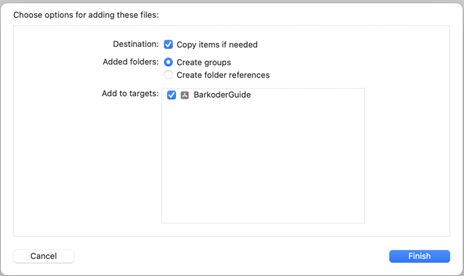
Add Barkoder.xcframework and BarkoderSDK.xcframework #
Add these items to the frameworks group (Copy items if needed, Create groups and Add to desired targets).
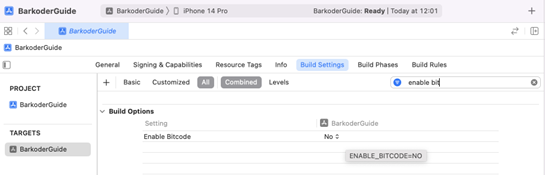
Enable Bitcode (set it to NO) #
In Build Settings, set Enable Bitcode to NO as shown in the image.
Update Info.plist #
Open Info.plist with Source Code and add the following changes:
                <key>NSCameraUsageDescription</key>
<string>BKD Scanner requires using camera</string>
Or using Property List add “Privacy - Camera Usage Description” and key "BKD Scanner requires using camera”

Add BarkoderView as a view #
Import BarkoderSDK and delcare barkoderView as a view
                import UIKit
import BarkoderSDK
class ViewController: UIViewController {
    private var barkoderView: BarkoderView!
    override func viewDidLoad() {
        super.viewDidLoad()
        setupUI()
        setupConstraints()
    }
    private func setupUI() {
        barkoderView = BarkoderView()
        view.addSubview(barkoderView)
    }
    private func setupConstraints() {
        barkoderView.translatesAutoresizingMaskIntoConstraints = false
        barkoderView.leadingAnchor.constraint(equalTo: view.leadingAnchor).isActive = true
        barkoderView.topAnchor.constraint(equalTo: view.topAnchor).isActive = true
        barkoderView.trailingAnchor.constraint(equalTo: view.trailingAnchor).isActive = true
        barkoderView.bottomAnchor.constraint(equalTo: view.bottomAnchor).isActive = true
    }
}
Licensing #
The SDK will scan barcodes even without a license, but results will come with an "UNLICENSED" prefix.
If you want to test the SDK today create a trial license https://barkoder.com/request-quote or just sign-up at barkoder.com/register to access all barKoder features.Alternatively, you can create a temporary trial license, one that is valid for 7 days without registering on our service by visiting https://barkoder.com/trial
If you want to test the SDK today create a trial license https://barkoder.com/request-quote or just sign-up at barkoder.com/register to access all barKoder features.Alternatively, you can create a temporary trial license, one that is valid for 7 days without registering on our service by visiting https://barkoder.com/trial
Create barKoder Config #
Setup the Barkoder Config according to your needs:
To perform scanning, the config property must be properly set.
As mentioned, if the license key is not valid, the resulting string will be with an UNLINCESED label.
                private func createBarkoderConfig() {
    barkoderView.config = BarkoderConfig(licenseKey: "LICENSE_KEY") { licenseResult in print("Licensing SDK: \(licenseResult)") }

    // Enable QR barcode type
    guard let decoderConfig = barkoderView.config?.decoderConfig else { return }
    decoderConfig.qr.enabled = true
}
Implement BarkoderResultDelegate protocol #
To receive the scanned results we need to implement this protocol:
                extension ViewController: BarkoderResultDelegate {
  func scanningFinished(_ decoderResults: [DecoderResult], thumbnails: [UIImage]?, image: UIImage?) {
    if let textualData = decoderResults[0].textualData {
      print("Scanned result: ", textualData)
    }
  }
}
Start the scanning process #
And finally start the scanning process:
try? barkoderView.startScanning(self)
For further assistance, you can submit a ticket through the Issue System of the barKoder Developer Portal.