React Native Integration - barKoder
Introduction
This tutorial demonstrates how to build a complete, production-ready barcode scanning application using the barKoder React Native SDK. The barKoder SDK is a powerful, enterprise-grade barcode scanning solution that leverages native device capabilities to deliver exceptional performance and accuracy.
Why barKoder?
The barKoder SDK stands out because:
- 40+ barcode symbologies (1D and 2D) - From traditional UPC/EAN codes to modern 2D matrix codes, the SDK handles virtually any barcode format you'll encounter in commercial, industrial, or consumer applications.
- Multiple scanning modes optimized for different use cases - Rather than a one-size-fits-all approach, barKoder provides specialized modes (Continuous, Multi-Scan, VIN, DPM, AR Mode, Document Mode, etc.) that are pre-configured for specific industries and scenarios.
- Advanced features like DPM, AR Mode, Multi-Scan, and more - Direct Part Marking (DPM) for industrial applications, Augmented Reality overlays for interactive experiences, and simultaneous multi-barcode scanning for batch operations.
- High performance with hardware-accelerated decoding - The SDK utilizes native device capabilities and optimized algorithms to achieve real-time scanning even on mid-range devices.
- Flexible configuration for any scanning scenario - Every aspect of the scanner behavior can be customized, from decoding speed and resolution to visual feedback and scanning regions.
What You'll Build
By the end of this tutorial, you'll have built a feature-rich scanning app with:
- Real-time barcode scanning - Instant barcode detection and decoding with configurable feedback
- Gallery image scanning - Scan barcodes from existing photos in your device's gallery
- Configurable settings - Full control over scanner behavior, performance, and user experience
- Scan history tracking - Persistent storage of scan results with timestamps and images
- Multiple specialized scanning modes - Switch between different modes optimized for various use cases
- Export functionality - Share scan results via CSV or other formats
- Camera controls - Flash, zoom, and camera switching capabilities
Project Setup
Prerequisites
Before starting, ensure you have:
- React Native development environment set up
- Node.js and npm/yarn installed
- iOS/Android development tools configured
Installing barKoder for React Native
First, add the barKoder SDK to your project:
npm install barkoder-react-native
# or
yarn add barkoder-react-native
License Key Setup
This app uses react-native-dotenv to manage environment variables. You need to provide a valid barKoder license key to run the app.
-
Create a file named
.envin the root directory of the project (same level aspackage.json). -
Add your license key to the [removed]
Important: Supplying a valid license key activates the SDK's scanning models (for example MRZ). Advanced, model-based scanning modes require an activated license and will be disabled or operate in a limited fallback state without one.
Core Architecture
Navigation Setup
The app uses React Navigation with a stack navigator:
import { NavigationContainer } from '@react-navigation/native';
import { createNativeStackNavigator } from '@react-navigation/native-stack';

const Stack = createNativeStackNavigator();

function App(): React.JSX.Element {
  return (
    <NavigationContainer>
      <Stack.Navigator screenOptions={{ headerShown: false }}>
        <Stack.Screen name="Home" component={HomeScreen} />
        <Stack.Screen name="Scanner" component={ScannerScreen} />
        <Stack.Screen name="BarcodeDetails" component={BarcodeDetailsScreen} />
        <Stack.Screen name="History" component={HistoryScreen} />
        <Stack.Screen name="About" component={AboutScreen} />
      </Stack.Navigator>
    </NavigationContainer>
  );
}

export default App;
Implementing the Scanner
The BarkoderView Component
The BarkoderView is the core component for barcode scanning. It's a native view component that bridges barKoder SDK's native camera and decoding functionality to your React Native application.
Here is a simple explanation of how it Works:
- Native Camera Integration: BarkoderView creates a native camera preview that renders directly on the screen, ensuring optimal performance without the overhead of React Native's bridge for each frame.
-
License Validation: The
licenseKeyprop is validated when the component mounts. The SDK will verify your license against barKoder's servers (requires internet on first use, then cached). -
Barkoder Instance Creation: Once the view is created, the
onBarkoderViewCreatedcallback provides a reference to the barKoder instance, which is your interface to all SDK functionality. - Configuration Pipeline: After receiving the barKoder instance, you configure barcode types, settings, and behavior before starting the scanning process.
Here's how to integrate it:
import { BarkoderView, Barkoder } from 'barkoder-react-native';
import { BARKODER_LICENSE_KEY } from '@env';

const ScannerScreen = () => {
  // Store reference to the Barkoder instance
  const barkoder= useRef<Barkoder | null>(null);

  // Called when the native view is ready
  const onBarkoderViewCreated = (barkoder: Barkoder) => {
    barkoder.current = barkoder;

    // Now you can configure the scanner
    configureScanner(barkoder);

    // Enable barcode types
    configureBarcodeTypes(barkoder);

    // Start scanning
    startScanning();
  };

  return (
    <View style={styles.container}>
      <BarkoderView
        style={styles.scanner}  // Must have explicit dimensions
        licenseKey={BARKODER_LICENSE_KEY}
        onBarkoderViewCreated={onBarkoderViewCreated}
      />
    </View>
  );
};
Important Notes:
- The BarkoderView must have explicit dimensions (using StyleSheet or flex)
- The component should not be conditionally rendered if you need persistent camera access
- Keep the barKoder reference in a ref, not state, to avoid unnecessary re-renders
Starting the Scanning Process
Once the barKoder instance is created, you can start scanning:
const startScanning = useCallback(() => {
  barkoder.startScanning((result) => {
    if (result.decoderResults && result.decoderResults.length > 0) {
      const scannedBarcode = result.decoderResults[0];

      console.log('Barcode Text:', scannedBarcode.textualData);
      console.log('Barcode Type:', scannedBarcode.barcodeTypeName);

      // Process the scan result
      handleScanResult(scannedBarcode);
    }
  });
}, []);
Handling Scan Results
The SDK provides comprehensive result data that includes not only the decoded barcode text but also metadata, location information, and captured images.
When a barcode is successfully scanned, the callback receives a result object containing:
- decoderResults: Array of decoded barcodes (multiple in multi-scan mode)
- textualData: The decoded barcode string
- barcodeTypeName: Human-readable barcode type (e.g., "QR", "Code 128")
- resultImageAsBase64: Full camera frame as base64-encoded JPEG
- resultThumbnailsAsBase64: Array of cropped barcode region thumbnails
- locationData: Coordinates of barcode corners in the image (if enabled)
// Processing Scan Results
const handleScanResult = (result: any) => {
  // Extract barcode data from the first result
  const barcodeText = result.textualData;
  const barcodeType = result.barcodeTypeName;

  // Process the full camera frame image (if enabled)
  // This is useful for verification, auditing, or showing context
  let fullImage = result.resultImageAsBase64;
  if (fullImage && !fullImage.startsWith('data:')) {
    // Add data URI prefix for display in Image components
    fullImage = `data:image/jpeg;base64,${fullImage}`;
  }

  // Process the thumbnail (cropped barcode region)
  // Thumbnails are smaller and better for list displays
  let thumbnail = result.resultThumbnailsAsBase64?.[0];
  if (thumbnail && !thumbnail.startsWith('data:')) {
    thumbnail = `data:image/jpeg;base64,${thumbnail}`;
  }

  // Save to persistent history
  // This allows users to review past scans
  HistoryService.addScan({
    text: barcodeText,
    type: barcodeType,
    image: thumbnail || fullImage,  // Prefer thumbnail for storage efficiency
    timestamp: new Date(),
  });

  // Update UI state to display the result
  // Using functional update to avoid stale closure issues
  setScannedItems(prev => [
    { text: barcodeText, type: barcodeType, image: thumbnail },
    ...prev  // Prepend to show most recent first
  ]);

  // Optional: Perform actions based on barcode type or content
  performBarcodeAction(barcodeText, barcodeType);
};

// Example: Different actions for different barcode types
const performBarcodeAction = (text: string, type: string) => {
  if (type === 'QR' && text.startsWith('http')) {
    // QR code with URL - offer to open in browser
    Alert.alert('URL Found', 'Open this link?', [
      { text: 'Cancel', style: 'cancel' },
      { text: 'Open', onPress: () => Linking.openURL(text) }
    ]);
  } else if (['EAN13', 'UPCA'].includes(type)) {
    // Retail barcode - could look up product information
    lookupProduct(text);
  }
};
Images add overhead and could be disabled for high-speed scanning:
// Disable images for continuous fast scanning
if (continuousMode && needHighSpeed) {
  barkoder.setImageResultEnabled(false);
  barkoder.setBarcodeThumbnailOnResultEnabled(false);
}

// Enable images for verification or auditing
if (needsVerification) {
  barkoder.setImageResultEnabled(true);
  barkoder.setBarcodeThumbnailOnResultEnabled(true);
}
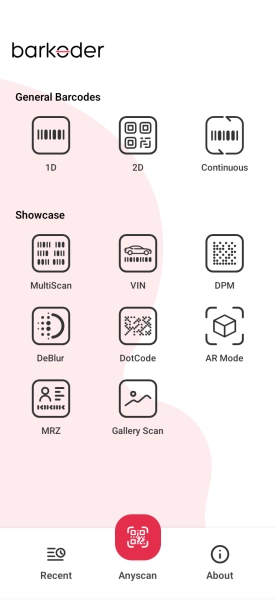
Understanding Scanning Modes
The app supports multiple specialized scanning modes, each optimized for specific use cases.
export const MODES = {
  MODE_1D: 'mode_1d',           // Only 1D barcodes
  MODE_2D: 'mode_2d',           // Only 2D barcodes
  CONTINUOUS: 'continuous',     // Fast continuous scanning
  MULTISCAN: 'multiscan',       // Scan multiple codes at once
  VIN: 'vin',                   // Vehicle Identification Numbers
  DPM: 'dpm',                   // Direct Part Marking
  DEBLUR: 'deblur',             // Enhanced for blurry codes
  DOTCODE: 'dotcode',           // Specialized for DotCode
  AR_MODE: 'ar_mode',           // Augmented Reality overlay
  MRZ: 'mrz',                   // Machine Readable Zones (passports)
  GALLERY: 'gallery',           // Scan from images
};
Each mode has optimized default settings:
const getInitialSettings = (currentMode: string): ScannerSettings => {
  const initialSettings: ScannerSettings = {
    compositeMode: false,
    pinchToZoom: true,
    locationInPreview: true,
    regionOfInterest: false,
    beepOnSuccess: true,
    vibrateOnSuccess: true,
    scanBlurred: false,
    scanDeformed: false,
    continuousScanning: false,
    decodingSpeed: Barkoder.DecodingSpeed.normal,
    resolution: Barkoder.BarkoderResolution.HD,
    continuousThreshold: 0
  };

  // Mode-specific optimizations
  if (currentMode === MODES.CONTINUOUS) {
    initialSettings.continuousScanning = true;
    initialSettings.continuousThreshold = -1; // it can take values -1, or n > 0
  }

  if (currentMode === MODES.MULTISCAN) {
    initialSettings.continuousScanning = true;
  }

  if (currentMode === MODES.VIN) {
    initialSettings.decodingSpeed = Barkoder.DecodingSpeed.slow;
    initialSettings.resolution = Barkoder.BarkoderResolution.FHD;
    initialSettings.regionOfInterest = true;
  }

  if (currentMode === MODES.DPM) {
    initialSettings.decodingSpeed = Barkoder.DecodingSpeed.slow;
    initialSettings.resolution = Barkoder.BarkoderResolution.FHD;
    initialSettings.regionOfInterest = true;
  }

  if (currentMode === MODES.AR_MODE) {
    initialSettings.resolution = Barkoder.BarkoderResolution.FHD;
    initialSettings.decodingSpeed = Barkoder.DecodingSpeed.slow;
    initialSettings.continuousScanning = true;
    initialSettings.arMode = Barkoder.BarkoderARMode.interactiveEnabled;
    initialSettings.arLocationType = Barkoder.BarkoderARLocationType.none;
  }

  return initialSettings;
};
Continuous Scanning Mode
Continuous scanning mode transforms the scanner into a high-throughput barcode reading machine, perfect for scenarios where you need to scan many items quickly without manual intervention between scans.
How Continuous Mode Works
- No Session Closure: Unlike single-scan mode where the scanner pauses after each successful read, continuous mode keeps the camera and decoder running continuously.
- Result Caching: To prevent duplicate scans of the same barcode, the SDK maintains a cache of recently scanned codes. You can configure how many unique codes to cache.
- Automatic Filtering: When a barcode matches one in the cache, it's automatically filtered out and won't trigger another result callback.
- Cache Expiration: Codes are removed from cache based on the limit you set, using a FIFO (First In, First Out) strategy.
// Enable continuous scanning - scanner never stops automatically
barkoder.setCloseSessionOnResultEnabled(false);

// Configure result caching to prevent duplicate scans
if (settings.continuousThreshold !== undefined) {
  barkoder.setResultsCacheEnabled(true);

  // Cache limit options:
  // -1 = Ignores duplicates completely — each barcode is scanned only once.
  // 0 = Allows scanning the same barcode continuously, with no delay between scans.
  // 1-10 = Allows scanning the same barcode again only after n seconds.
  barkoder.setResultsCacheLimit(settings.continuousThreshold);
}
Note: When using continuous you need to disable the thumbnails as returning those on the Android platform will create performance issues
Use cases:
- Inventory scanning: Scan shelves or storage areas quickly
- Retail checkout: Ring up multiple items without button presses
- Warehouse management: Verify pallet contents or shipments
- Event ticketing: Rapid check-in of attendees
- Library systems: Check out multiple books in one session
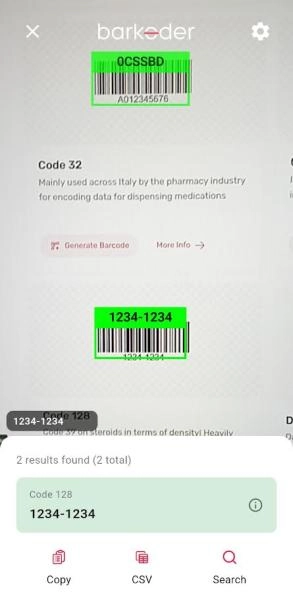
Multi-Scan Mode
Scan multiple barcodes simultaneously:
// Configure for multi-scan
const multiScanSettings = {
  // Similar as continuous scanning - disabling the automatic closing of the scanning session after a result is obtained.
 barkoder.setCloseSessionOnResultEnabled(false);

  // The feature also includes an option to set a caching duration for the codes scanned and the ability to enable multicode caching. The duplicates delay and maximum results count can also be adjusted.
  barkoder.setMaximumResultsCount(200);
  barkoder.setMulticodeCachingDuration(3000);
  barkoder.setMulticodeCachingEnabled(true);

  // For best result decoding speed and barkoder resolution should be normal.
  barkoder.setDecodingSpeed(Barkoder.DecodingSpeed.normal),
  barkoder.setBarkoderResolution(Barkoder.BarkoderResolution.HD),
};
Use cases:
- Batch processing
- Document scanning with multiple codes
- Pallet verification
VIN Mode (Vehicle Identification)
Optimized for scanning Vehicle Identification Numbers:
const vinSettings = {
  barkoder.setEnableVINRestrictions(true);
  barkoder.setRegionOfInterest(0, 35, 100, 30);

  // For best result decoding speed is set to slow and barkoder resolution is set to high.
  barkoder.setDecodingSpeed(Barkoder.DecodingSpeed.slow),
  barkoder.setBarkoderResolution(Barkoder.BarkoderResolution.FHD),
};
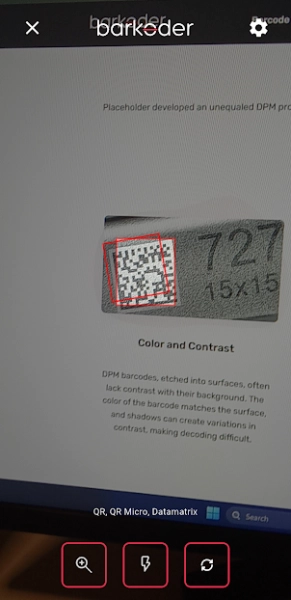
DPM Mode (Direct Part Marking)
Direct Part Marking (DPM) is a specialized technique where barcodes are permanently marked directly onto parts using methods like laser etching, dot peen marking, or chemical etching. These marks are notoriously difficult to scan because they often have low contrast, inverted colors (dark background, light marks), or irregular surfaces.
Standard barcode scanning algorithms are designed for dark bars or modules on light backgrounds with high contrast, which makes Direct Part Marking (DPM) codes more difficult to read. These codes often use inverted colors with light markings on dark surfaces, may suffer from low contrast due to subtle etching, and are applied to surfaces that are curved, reflective, or textured. Additionally, DPM codes are frequently very small because of limited space on industrial parts, and their varying etched depth can further complicate detection by affecting how light interacts with the code.
const dpmSettings = {
 barkoder.setBarcodeTypeEnabled(Barkoder.BarcodeType.datamatrix, true);
  barkoder.setDatamatrixDpmModeEnabled(true);

  // A Region of Interest is also set to optimize the viewfinder for scanning
  barkoder.setRegionOfInterest(40, 40, 20, 10);

  // For best result decoding speed is set to slow and barkoder resolution is set to high.
  barkoder.setDecodingSpeed(Barkoder.DecodingSpeed.slow),
  barkoder.setBarkoderResolution(Barkoder.BarkoderResolution.FHD),
};
Use cases:
- Automotive parts: Engine components, chassis numbers
- Medical devices: Surgical instruments, implants
- Aerospace components: Critical aircraft parts with traceability
- Electronics: PCBs, semiconductors
- Industrial tools: Precision instruments, quality control samples
AR Mode (Augmented Reality)
Overlay interactive elements on detected barcodes:
const arSettings = {
  barkoder.setCloseSessionOnResultEnabled(false);

  // You can choose between the following modes based on your use case:
  // interactiveEnabled  = AR enabled and new barcodes are automatically selected.
  // interactiveDisabled = AR enabled, but new barcodes are not selected automatically.
  // nonInteractive = AR is enabled with non-interactive behavior; selection happens automatically without user interactions.
  barkoder.setARMode(Barkoder.BarkoderARMode.interactiveEnabled);

  // For best result decoding speed is set to slow and barkoder resolution is set to high.
  barkoder.setDecodingSpeed(Barkoder.DecodingSpeed.slow),
  barkoder.setBarkoderResolution(Barkoder.BarkoderResolution.FHD),

  // To visually indicate whether a barcode is selected or not:
  barkoder.setARSelectedLocationColor('#HEX');       // Color for selected barcodes
  barkoder.setARN[removed]edLocationColor('#HEX');    // Color for non-selected barcodes

  // You can control when barcode header text (label) is displayed
  barkoder.setARHeaderShowMode(Barkoder.BarkoderARHeaderShowMode.[removed]ed);
};MRZ Mode
MRZ Scanning extracts critical data from the machine-readable zone of documents, particularly travel-related IDs such as passports and visas. This data includes personal information like name, nationality, passport number, and expiration date. MRZ scanning is essential in applications like border control, immigration, and identity verification.
const mrzSettings = {
  barkoder.setBarcodeTypeEnabled(Barkoder.BarcodeType.idDocument, true);
};
Scanner Settings & Configuration
Each setting in the ScannerSettings interface controls a specific aspect of the scanner's behavior. Understanding these settings allows you to optimize the scanner for your specific use case.
const applySettings = (settings: ScannerSettings) => {
  if (!barkoder.current) return;

  // Image capture settings
  const shouldEnableImages = !(
    settings.continuousScanning &&
    (settings.continuousThreshold ?? 0) < 10
  );
  barkoder.current.setImageResultEnabled(shouldEnableImages);
  barkoder.current.setBarcodeThumbnailOnResultEnabled(shouldEnableImages);

  // General settings
  barkoder.current.setEnableComposite(settings.compositeMode ? 1 : 0);
  barkoder.current.setPinchToZoomEnabled(settings.pinchToZoom);
  barkoder.current.setLocationInPreviewEnabled(settings.locationInPreview);
  barkoder.current.setRegionOfInterestVisible(settings.regionOfInterest);

  // Region of Interest dimensions
  if (settings.regionOfInterest) {
    barkoder.current.setRegionOfInterest(5, 5, 90, 90);
  }

  // Feedback settings
  barkoder.current.setBeepOnSuccessEnabled(settings.beepOnSuccess);
  barkoder.current.setVibrateOnSuccessEnabled(settings.vibrateOnSuccess);

  // Quality enhancement
  barkoder.current.setUpcEanDeblurEnabled(settings.scanBlurred);
  barkoder.current.setEnableMisshaped1DEnabled(settings.scanDeformed);

  // Scanning behavior
  barkoder.current.setCloseSessionOnResultEnabled(!settings.continuousScanning);

  // Performance
  barkoder.current.setDecodingSpeed(settings.decodingSpeed);
  barkoder.current.setBarkoderResolution(settings.resolution);
};
Performance Settings
Decoding Speed
enum DecodingSpeed {
  fast,      // Fastest, may miss difficult barcodes
  normal,    // Balanced speed and accuracy
  slow,      // Thorough, best for damaged codes
  rigorous   // Most thorough, for gallery scanning
}
Recommendations:
- Fast: Retail/POS scanning
- Normal: General use, continuous scanning
- Slow: VIN, DPM, difficult conditions
- Rigorous: Gallery/image scanning
Resolution Settings
enum BarkoderResolution {
  UHD,    // Lowest resolution, fastest
  HD,     // 720p - good balance
  FHD     // 1080p - best quality
}
Trade-offs:
- Higher resolution = Better accuracy for small/distant codes
- Lower resolution = Faster processing, better battery life
Region of Interest
Restrict scanning to a specific area for better performance:
// Set ROI (left, top, width, height)
barkoder.setRegionOfInterest(10, 20, 80, 60);

// Show visual indicator
barkoder.setRegionOfInterestVisible(true);
Barcode Type Configuration
The SDK supports 40+ barcode symbologies:
export const BARCODE_TYPES_1D = [
  { id: 'code128', label: 'Code 128' },
  { id: 'code39', label: 'Code 39' },
  { id: 'code93', label: 'Code 93' },
  { id: 'codabar', label: 'Codabar' },
  { id: 'code11', label: 'Code 11' },
  { id: 'msi', label: 'MSI' },
  { id: 'ean13', label: 'EAN 13' },
  { id: 'ean8', label: 'EAN 8' },
  { id: 'upcA', label: 'UPC-A' },
  { id: 'upcE', label: 'UPC-E' },
  { id: 'interleaved25', label: 'Interleaved 2 of 5' },
  { id: 'itf14', label: 'ITF 14' },
  { id: 'databar14', label: 'GS1 Databar 14' },
  { id: 'databarExpanded', label: 'GS1 Databar Expanded' },
  { id: 'databarLimited', label: 'GS1 Databar Limited' },
  // ... and more
];

export const BARCODE_TYPES_2D = [
  { id: 'qr', label: 'QR Code' },
  { id: 'qrMicro', label: 'Micro QR' },
  { id: 'datamatrix', label: 'Data Matrix' },
  { id: 'pdf417', label: 'PDF417' },
  { id: 'pdf417Micro', label: 'Micro PDF417' },
  { id: 'aztec', label: 'Aztec' },
  { id: 'aztecCompact', label: 'Aztec Compact' },
  { id: 'dotcode', label: 'DotCode' },
  { id: 'maxiCode', label: 'MaxiCode' },
  { id: 'idDocument', label: 'ID Document' },
];
Advanced Features
Professional barcode scanning apps need robust camera controls to handle various lighting conditions, distances, and user preferences. The barKoder SDK provides programmatic access to all essential camera features.
Flash Toggle
The camera flash (torch) is essential for low-light environments and can dramatically improve scan success rates in dim conditions.
const [isFlashOn, setIsFlashOn] = useState(false);

const toggleFlash = useCallback(() => {
  const newState = !isFlashOn;
  setIsFlashOn(newState);
  barkoder.setFlashEnabled(newState);
}, [isFlashOn]);
Zoom Control
Zoom allows users to scan small or distant barcodes without physically moving closer. This is particularly useful for shelf scanning or items behind glass.
const [zoomLevel, setZoomLevel] = useState(1.0);

// Simple toggle between normal and zoomed
const toggleZoom = useCallback(() => {
  const newZoom = zoomLevel === 1.0 ? 1.5 : 1.0;
  setZoomLevel(newZoom);
  barkoder.setZoomFactor(newZoom);
}, [zoomLevel]);
Camera Switching
Most devices have front and rear cameras. While rear cameras typically have better quality, front cameras enable self-scanning scenarios.
const [selectedCameraId, setSelectedCameraId] = useState('0'); // '0' = back, '1' = front

const toggleCamera = useCallback(() => {
  const newCameraId = selectedCameraId === '0' ? '1' : '0';
  setSelectedCameraId(newCameraId);
  barkoder.setCameraId(newCameraId);
}, [selectedCameraId]);

// Advanced: Get available cameras and their capabilities
const getCameraList = async () => {
  // Some devices have multiple rear cameras (wide, telephoto, etc.)
  const cameras = await barkoder.getAvailableCameras();
  return cameras;
};
Use Cases for Front Camera:
- Self-service kiosks: Users scan their own tickets/passes
- Video calls: Showing barcode to remote operator
- Accessibility: Easier for users with limited mobility
- Mirror mode: When rear camera view is confusing
Gallery Scanning
Scan barcodes from existing images:
import { launchImageLibrary } from 'react-native-image-picker';

const handleGalleryScan = () => {
  launchImageLibrary(
    {
      mediaType: 'photo',
      selectionLimit: 1,
      includeBase64: true
    },
    (response) => {
      if (response.didCancel || response.errorCode) {
        return;
      }

      if (response.assets?.[0]?.base64) {
        const base64Image = response.assets[0].base64;

        // Scan the image
        barkoder.scanImage(base64Image, (result) => {
          if (result.decoderResults?.length > 0) {
            const barcode = result.decoderResults[0];
            handleScanResult(barcode);
          } else {
            Alert.alert('No Barcode Found', 'Could not detect any barcode in the image.');
          }
        });
      }
    }
  );
};
Scan History Management
Track all scanned barcodes:
// HistoryService.ts
class HistoryServiceClass {
  private storageKey = '@scan_history';

  async addScan(scan: {
    text: string;
    type: string;
    image?: string;
    timestamp?: Date;
  }) {
    const history = await this.getHistory();
    const newScan = {
      ...scan,
      timestamp: scan.timestamp || new Date(),
      id: Date.now().toString(),
    };

    const updated = [newScan, ...history].slice(0, 100); // Keep last 100
    await AsyncStorage.setItem(this.storageKey, JSON.stringify(updated));
  }

  async getHistory() {
    const data = await AsyncStorage.getItem(this.storageKey);
    return data ? JSON.parse(data) : [];
  }

  async clearHistory() {
    await AsyncStorage.setItem(this.storageKey, JSON.stringify([]));
  }
}

export const HistoryService = new HistoryServiceClass();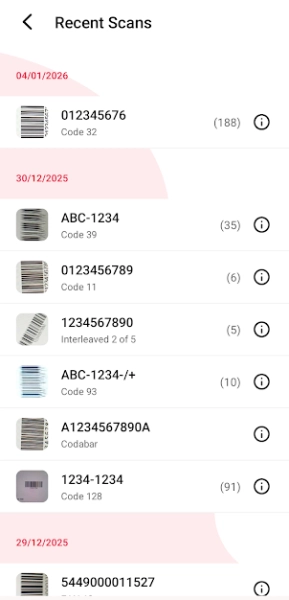
Export Scanned Data
Export scan results as CSV:
import RNFS from 'react-native-fs';
import Share from 'react-native-share';

const handleCSVExport = async (scannedItems: Array<any>) => {
  if (scannedItems.length === 0) return;

  const header = 'Barcode,Type,Timestamp\\\\n';
  const rows = scannedItems.map(item =>
    `"${item.text.replace(/"/g, '""')}","${item.type}","${item.timestamp}"`
  ).join('\\\\n');

  const csvContent = header + rows;
  const path = RNFS.CachesDirectoryPath + '/scanned_barcodes.csv';

  try {
    await RNFS.writeFile(path, csvContent, 'utf8');
    await Share.open({
      url: '[removed]//' + path,
      type: 'text/csv',
      title: 'Share Scanned Barcodes',
      failOnCancel: false,
    });
  } catch (error) {
    console.error('Error sharing CSV:', error);
  }
};
Conclusion
Congratulations! You've now built a comprehensive barcode scanning application using barKoder!
Resources
- barKoder Documentation: https://barkoder.com/docs/v1/home
- API Reference: react-native-api-reference
- Sample App: github/barKoderReactNative
- Support: support@barkoder.com
Happy Scanning!
For questions or support, reach out to the barKoder team or check the documentation.
This tutorial is based on barKoder SDK version 1.6.8 for React Native. Features and APIs may vary in different versions.